This section introduces how to use basic functions of video SDK to use a video call. For deeper understanding of the functions, see information about advanced functions or get help from access personnel.
Before you start, ensure that the following are available:
After the preceding prerequisites are met, SDK development can be started.
buildscript {
    repositories {
        jcenter()
        maven {url "https://dl.bintray.com/yyqapm/maven"}
    }
}

allprojects {
    repositories {
        jcenter()
        maven {url "https://dl.bintray.com/yyqapm/maven"}
    }
}
dependencies {
    implementation 'com.rtc.thunder:thunderbolt:x.y.z' //For X.Y.Z, please fill in a specific SDK version number, such as 2.8.2.
}
<manifest xmlns:android="http://schemas.android.com/apk/res/android"
    xmlns:tools="http://schemas.android.com/tools"
    package="com.xxx.xxxx">
    .....
    //Add permission
    <uses-permission android:name="android.permission.BLUETOOTH" />
    <uses-permission android:name="android.permission.BLUETOOTH_ADMIN" />
    <uses-permission android:name="android.permission.INTERNET" />
    <uses-permission android:name="android.permission.ACCESS_NETWORK_STATE" />
    <uses-permission android:name="android.permission.READ_PHONE_STATE" />
    <uses-permission android:name="android.permission.MODIFY_AUDIO_SETTINGS" />
    <uses-permission android:name="android.permission.RECORD_AUDIO" />
    <uses-permission android:name="android.permission.WRITE_EXTERNAL_STORAGE" />
    <uses-permission android:name="android.permission.READ_EXTERNAL_STORAGE" />
    <uses-permission android:name="android.permission.WAKE_LOCK" />
    <uses-permission android:name="android.permission.CAMERA" />
    <uses-permission android:name="android.permission.ACCESS_WIFI_STATE" />


    //Add software features
    <uses-feature android:name="android.hardware.audio.low_latency" />
    <uses-feature android:name="android.hardware.audio.pro" />
    <uses-feature android:name="android.hardware.microphone" android:required="true" />
    <uses-feature android:name="android.hardware.camera.autofocus" />
    <uses-feature android:name="android.hardware.camera" android:required="true" />
    <uses-feature android:name="android.hardware.camera.front" android:required="true" />
</manifest>
If code obfuscation is enabled during application compilation, the obfuscation must be prevented. Add the following information to the rule file proguard-rules.pro (/app/proguard-rules.pro) to prevent mixing public names in the library:
-keep class com.rtc.thunder.** { *; }
-keep class org.webrtc.audioengine.** { *; }
-keep class com.yy.yyvideolib.** { *; }
-keep class com.yy.yyvideoplayer.** { *; }
-keep class com.yy.android.medialibrary.audiocodec.** { *; }
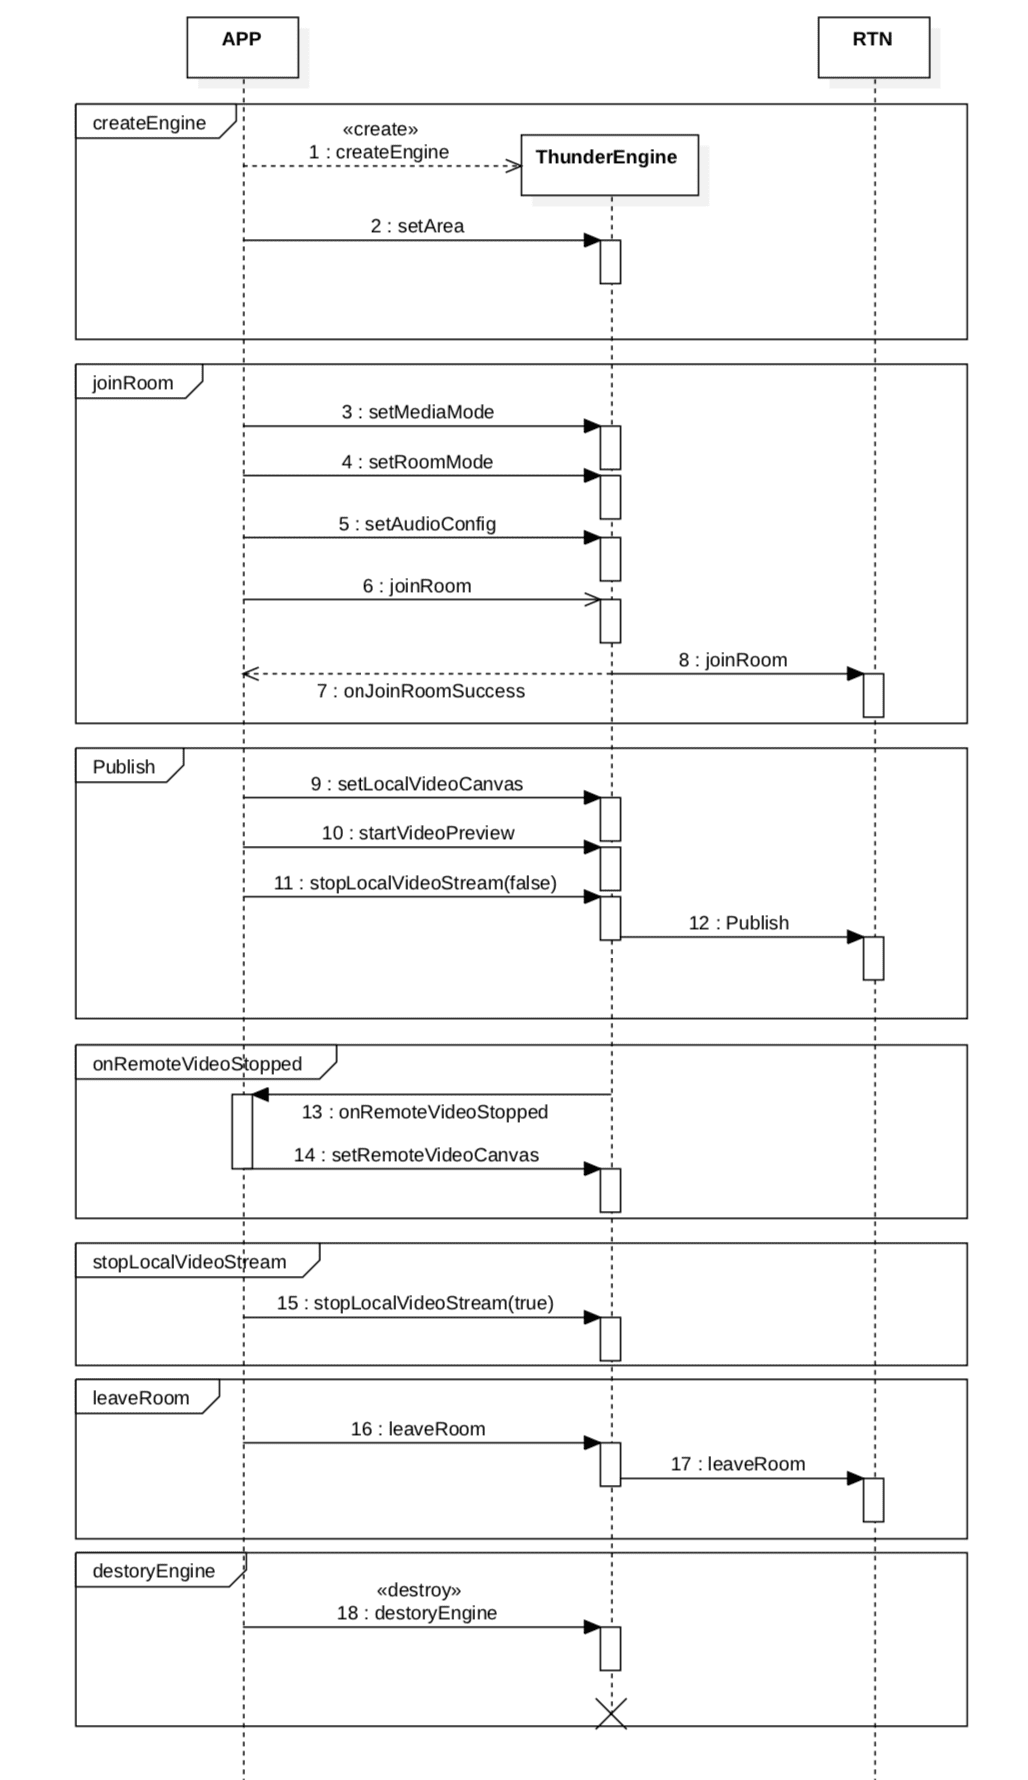
After SDK integration, we can realize the real-time video call by SDK. The following figure shows the time sequence of API calling during a video call:
Call checkSelfPermission. When enabling Activity, check and obtain camera and microphone permissions of a mobile device.
private static final String[] REQUEST_PERMISSIONS = new String[]{
        Manifest.permission.CAMERA,
        Manifest.permission.WRITE_EXTERNAL_STORAGE,
        Manifest.permission.READ_EXTERNAL_STORAGE,
        Manifest.permission.INTERNET,
        Manifest.permission.ACCESS_NETWORK_STATE,
        Manifest.permission.RECORD_AUDIO,
        Manifest.permission.MODIFY_AUDIO_SETTINGS,
        Manifest.permission.BLUETOOTH,
        Manifest.permission.BLUETOOTH_ADMIN
};

@Override
protected void onCreate(Bundle savedInstanceState) {
    super.onCreate(savedInstanceState);
    setContentView(R.layout.activity_video_chat_view);


    if (checkSelfPermission(REQUESTED_PERMISSIONS[0], PERMISSION_REQ_ID) &&
        checkSelfPermission(REQUESTED_PERMISSIONS[1], PERMISSION_REQ_ID) &&
        checkSelfPermission(REQUESTED_PERMISSIONS[2], PERMISSION_REQ_ID)) {
      // TODO:
      // After obtaining permission, initialize SDK and join channel.
    }
}

private boolean checkSelfPermission(String permission, int requestCode) {
    if (ContextCompat.checkSelfPermission(this, permission) !=
            PackageManager.PERMISSION_GRANTED) {
        ActivityCompat.requestPermissions(this, REQUESTED_PERMISSIONS, requestCode);
        return false;
    }

    return true;
}
Before calling other Thunder APIs, create and initialize the ThunderEngine object.
You should fill in the APPID of the project in this step. See the following steps to create a project and get [APPID] in Console.
ThunderEngine.createEngine(Context context,String appId,long sceneId,ThunderEventHandler handler);
ThunderEngine.setArea(isChina ?
                ThunderRtcConstant.AreaType.THUNDER_AREA_DEFAULT :
                ThunderRtcConstant.AreaType.THUNDER_AREA_FOREIGN);
See details in API Manual about createEngine, createWithLoop, and setArea.
When creating ThunderEngine, you should monitor SDK events and status callback through ThunderEventHandler as required by the scenario. For example:
public void onTokenWillExpire() {}
public void onConnectionStatus(){}
public void onRemoteVideoStopped(String uid, boolean stop) {}
Before joining a room, set room profiles to obtain better user experience.
Note: when joining a room, provide a token. See Generate Token to obtain a token.
ThunderEngine.setMediaMode(isAudio ?
                ThunderRtcConstant.ThunderRtcProfile.THUNDER_PROFILE_ONLY_AUDIO :
                ThunderRtcConstant.ThunderRtcProfile.THUNDER_PROFILE_NORMAL);
ThunderEngine.setRoomMode(int mode);
ThunderEngine.setAudioConfig(int profile,int commutMode,int scenarioMode);
ThunderEngine.joinRoom(byte[] token, String roomName, String uid);
See details in API Manual about setMediaMode, setRoomMode, and joinRoom.
ThunderVideoCanvas canvas = new ThunderVideoCanvas(ThunderPreviewView view, scaleMode, uid);
ThunderEngine.setLocalCanvasScaleMode(scaleMode);
ThunderEngine.setLocalVideoCanvas(canvas);
ThunderEngine.startVideoPreview();
See details in API Manual about setLocalVideoCanvas and startVideoPreview.
ThunderEngine.stopLocalVideoStream(false);
See details in API Manual about stopLocalVideoStream.
ThunderEngine.stopLocalVideoStream(true);
ThunderEngine.stopVideoPreview();
See details in API Manual about stopLocalVideoStream and stopVideoPreview.
During local publishing, you can set publishing parameters:
ThunderEngine.setVideoEncoderConfig(ThunderVideoEncoderConfiguration yyVideoConfig);
See details in API Manual about setVideoEncoderConfig.
If another user begins publishing in your room, you will receive event callback of onRemoteVideoStopped in the ThunderEventHandler callback:
public void onRemoteVideoStopped(String uid, boolean stop) {}
After receiving this event, the video of the remote user should be rendered:
ThunderVideoCanvas canvas = new ThunderVideoCanvas(ThunderPlayerView view, int renderMode, String uid);
ThunderEngine.setRemoteVideoCanvas(canvas);
See details in API Manual about setRemoteVideoCanvas.
To end a call, disable the application or switch it to the background, call leaveRoom to exit the current call channel.
int ret = mThunderEngine.leaveRoom();
See details in API Manual about [leaveRoom](/en/product_category/rtc_service/rt_audio_interaction/api/Android/current/function.html#thunderengineleaveroom).
Pay attention to the following during integration:
 Helpful
 Not helpful
 Submitted! Your feedback would help us improve the website.
 Feedback
 Top
Top