This section introduces how to quickly start an audio call with the audio SDK for Android.
This section introduces how to create an Android project, integrate audio SDK to your project and add corresponding device permissions.
buildscript {
    repositories {
        maven { url "http://nexus.jocloud.com:8081/nexus/content/groups/public/ }
        ......
    }
}

allprojects {
    repositories {
        ......
        maven { url "http://nexus.jocloud.com:8081/nexus/content/groups/public/" }
        ......
    }
}
dependencies{
	implementation "com.rtc.thunder:thunder:X.Y.Z" // For X.Y.Z, please fill in a specific SDK version number, such as 2.8.2.
}
-keep class com.rtc.thunder.** { *; }
To ensure SDK functions normally, add the following permissions into file AndroidManisfest.xml after the library is added.
    //Add permission
    <uses-permission android:name="android.permission.BLUETOOTH" />
    <uses-permission android:name="android.permission.BLUETOOTH_ADMIN" />
    <uses-permission android:name="android.permission.INTERNET" />
    <uses-permission android:name="android.permission.ACCESS_NETWORK_STATE" />
    <uses-permission android:name="android.permission.READ_PHONE_STATE" />
    <uses-permission android:name="android.permission.MODIFY_AUDIO_SETTINGS" />
    <uses-permission android:name="android.permission.RECORD_AUDIO" />
    <uses-permission android:name="android.permission.WRITE_EXTERNAL_STORAGE" />
    <uses-permission android:name="android.permission.READ_EXTERNAL_STORAGE" />
    <uses-permission android:name="android.permission.WAKE_LOCK" />
    <uses-permission android:name="android.permission.CAMERA" />
    <uses-permission android:name="android.permission.ACCESS_WIFI_STATE" />

    //Add software features
    <uses-feature android:name="android.hardware.audio.low_latency" />
    <uses-feature android:name="android.hardware.audio.pro" />
    <uses-feature android:name="android.hardware.microphone" android:required="true" />
    <uses-feature android:name="android.hardware.camera.autofocus" />
    <uses-feature android:name="android.hardware.camera" android:required="true" />
    <uses-feature android:name="android.hardware.camera.front" android:required="true" />
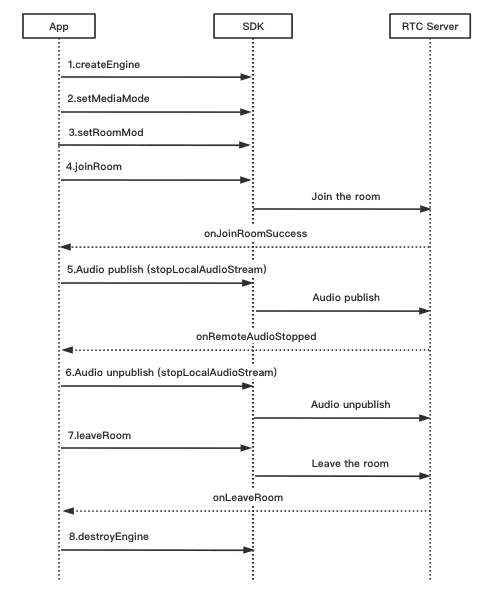
This section introduces how to use real-time voice call. The following chart shows the sequence of API calling during a voice call:
Before calling audio/video APIs, create and initialize the object of ThunderEngine. To initialize ThunderEngine, call createEngine and input AppID and scenario ID.
// "appId"-AppID, which issued by the application developer
// "sceneId"-custom scenario ID, which is used for subdividing service scenarios; if unnecessary, set it to 0
// "thunderEventHandler"-callback object
thunderEngine = ThunderEngine.createEngine(context, appId, sceneId, thunderEventHandler);
Media modes for SDK include audio-only and audio/video. Call setMediaMode before joining the room, which is invalidated after joining the room and audio/video is the mode by default without being called otherwise.
// THUNDER_PROFILE_DEFAULT(0)	    audio/video mode by default
// THUNDER_PROFILE_NORMAL(1)	    audio/video mode (audio and video are both used)
// THUNDER_PROFILE_ONLY_AUDIO(2)	audio-only mode (for scenarios without video, to prioritize audio quality)
thunderEngine.setMediaMode(THUNDER_PROFILE_NORMAL);
SDK can optimize by different methods in accordance with certain scenario of applications (such as communication mode or live streaming mode) and call setRoomMode to set room mode.
// THUNDER_ROOMCONFIG_LIVE(0)	live streaming mode, where quality is prioritized and delay is large. Applicable to audience scenarios.
//                              When an audience starts to publish and becomes an anchor, the mode changes to communication mode.
// THUNDER_ROOMCONFIG_COMMUNICATION(1)	communication mode is applicable for one-to-one communication and group conversation due to its low latency and smooth connection.
// THUNDER_ROOMCONFIG_MULTIAUDIOROOM(4)	voice chatroom mode is applicable for group voice chatroom due to its low latency and low bandwidth occupation.
thunderEngine.setRoomMode(THUNDER_ROOMCONFIG_COMMUNICATION);
After initialization, call joinRoom to join a room. Input the following parameters into this method:
thunderEngine.joinRoom(token, roomName, uid);
After joining the room, call stopLocalAudioStream to start audio publishing and send local audio stream. Input the following parameters into this method:
// Enable local audio sending (false)
thunderEngine.stopLocalAudioStream(false);
Note:
After joining the room, audio/video stream will be automatically subscribed. When other users in the channel publish/stop publishing,onRemoteAudioStoppedis received.
After joining the room, call stopLocalAudioStream to start audio publishing and send local audio stream. Upload the following parameters into this method:
// Disable local audio sending (true)
thunderEngine.stopLocalAudioStream(true);
Call leaveRoom to exit the current room. Whether in a call or not, this method can be called, and all resources related to conversation will be released after calling it.
// Exit the room
thunderEngine.leaveRoom();
Call destroyEngine to release all resources used by SDK and user cannot call other methods in this SDK.
// Destroy SDK instance
thunderEngine.destroyEngine();
 Helpful
 Not helpful
 Submitted! Your feedback would help us improve the website.
 Feedback
 Top
Top